Factorio Beacons Guide: Range, Modules, Setup & 8-Beacon Layouts
Factorio beacons are strongest when the layout, module choice and power grid are planned together. Use them to spread speed, efficiency or quality effects across nearby machines, but do not count a theoretical beacon total that the building footprint cannot actually support. This guide explains the current 2.0 effect rules, practical 8-beacon patterns, coverage limits, setup checks and the Space Age edge cases that can make a dense block underperform.
Last updated: August 22, 2026. Written for Factorio 2.0 and Space Age planning.
Quick Answer: What Do Factorio Beacons Do?
A beacon broadcasts the effects of the modules installed inside it to nearby compatible machines. In a practical build, speed beacons reduce the number of assemblers needed for a target rate, while efficiency and quality choices trade throughput, power, pollution or output quality. The best Factorio beacon setup is the one that fits the machines, belts, fluids and power margin you can actually maintain.
- Use speed modules when the limit is machine count, footprint or throughput; recalculate belts, fluids and trains after the change.
- Use efficiency modules when power or pollution is the bottleneck, but verify that the lower speed still meets the production target.
- Only speed and efficiency effects belong in ordinary beacons; productivity and quality behavior depends on the game version, machine and Space Age rules.
- Treat the effect area as a coverage problem: a machine may be in range but still miss the intended beacon count because of its footprint.
- Test the block under load. A beacon layout that reaches the target rate on paper can still fail through power peaks, belt limits or missing module supply.
Start with a Layout You Can Actually Build
The official Factorio examples make the key trade-off visible: more beacons can raise the combined effect, but the layout also consumes space, modules, electricity and construction time. Use a known pattern as a starting point, then verify its coverage against your exact machine size and recipe.
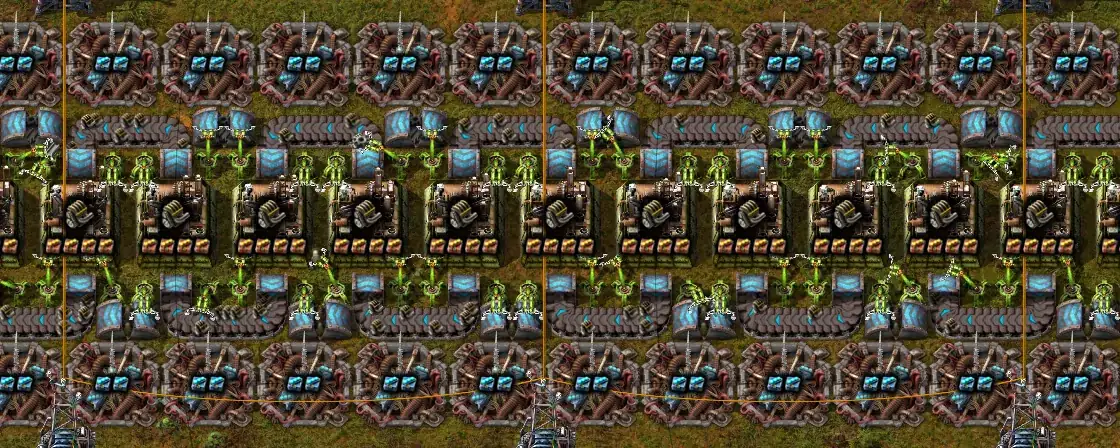
How Factorio Beacons Share Module Effects
A beacon has its own footprint, module slots and power demand, then transmits supported module effects to machines inside its coverage area. The result is not a simple one-to-one bonus: the effect from each beacon is reduced as more beacons affect the same machine, so the total gain rises with diminishing returns.
| Rule to check | Why it matters | Planning consequence |
|---|---|---|
| Beacon coverage | Every target machine must be inside the beacon's effect area | Leave room for the machine footprint, inserters and belts instead of counting nearby sprites |
| Module compatibility | The machine and recipe decide which effects are allowed | Check the recipe before standardizing a speed or quality block |
| Effect scaling | Each additional beacon contributes less than the previous one | Compare the extra output with the cost of more beacons, modules and power |
| Power demand | Beaconed blocks can create a large steady load and startup peak | Reserve generation and test the grid while the whole block is active |
| Transport capacity | Faster machines consume and output items more quickly | Recheck belts, inserters, pipes, trains and buffers after adding beacons |
Factorio Beacon Range and 1.1 vs 2.0 Effect Scaling
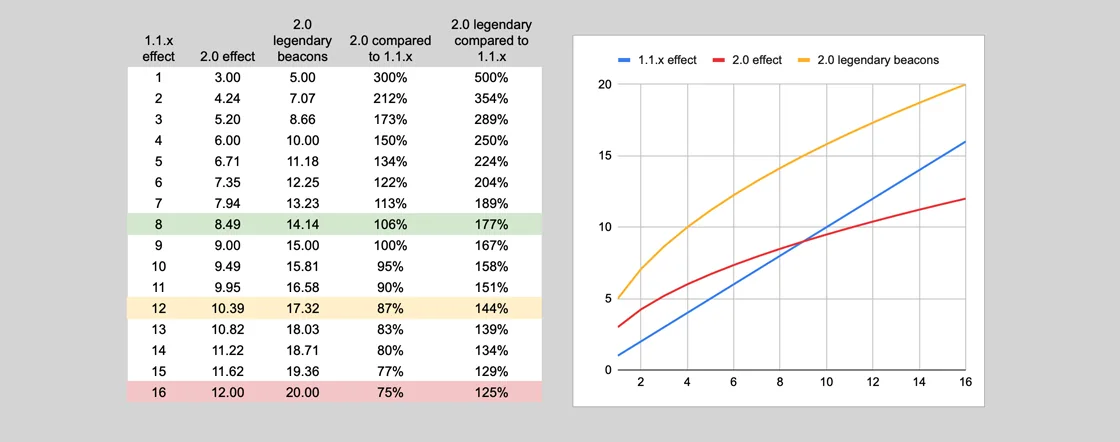
Older guides often quote the 1.1 beacon effect as a flat 50 percent of the module bonus. Factorio 2.0 uses a different transmission curve: a normal beacon has a 1.5 distribution efficiency, and the combined effect of n equally affecting normal beacons is commonly modeled as 1.5 times the square root of n. The important takeaway is that eight beacons are strong, but sixteen are not twice as strong as eight.
Eight beacons
A common compromise for compact production blocks. It gives a clear speed increase without forcing the full footprint and power bill of the densest layouts.
Twelve beacons
Often close to the practical maximum for a small machine footprint. Check the official effect curve and make sure inserters, belts and modules still fit.
Sixteen or more
Useful only when the factory can pay for the extra modules, power and construction space. Do not assume the visual density automatically improves the whole chain.
Which Modules Should Go into a Beacon?
Choose the beacon module from the bottleneck you are solving. A speed-focused block is not automatically better than an efficiency block, and a quality design needs a different success metric from a vanilla throughput build.
Speed modules
Use them when you need more output from a smaller footprint or fewer machines. They increase consumption and power demand, so pair the decision with a transport and energy check.
Efficiency modules
Use them when electricity or pollution is the limiting resource. They are a safer early expansion choice, but the lower effective speed can require more machines or a larger block.
Quality planning
In Space Age, quality targets add probability and expected-output decisions. Keep quality intent visible in the calculator and do not mix a quality experiment with a throughput benchmark without labeling both.
Productivity boundary
Productivity is usually a machine-side decision rather than a normal beacon choice. Check the current recipe and machine rules before assuming a productivity effect can be broadcast.
How to Build a Factorio Beacon Setup Step by Step
Build a small test block before turning a beacon pattern into a blueprint. The following sequence keeps coverage, modules, logistics and power visible instead of debugging everything at once.
Fix the production target
Choose the recipe, machine tier and required items per second first. A beacon count has no meaning until the output target and permitted modules are known.
Place the machines
Lay out assemblers, furnaces or other target machines with their inputs, outputs and fluid connections. Leave the inserter and belt lanes that the block will need at full rate.
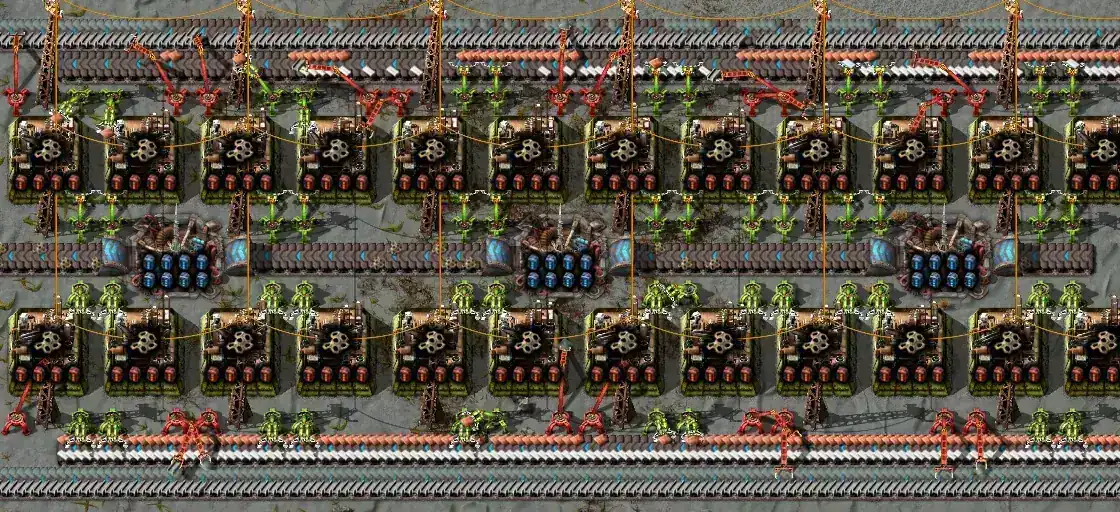
Add an eight-beacon pattern
Start with a compact eight-beacon arrangement or the closest official pattern that fits the machine footprint. Confirm that every target machine is covered, not merely the center machine.
Install modules and calculate again
Set the same beacon modules in the module calculator, then compare machine count, output, ingredient demand and power draw with the un-beaconed baseline.
Stress the block
Run the block with full input buffers, active outputs and the intended quality or productivity settings. Watch power, belt saturation, pipe flow, inserter timing and downstream train arrivals.
Power, Coverage and Transport Checks
Most failed beacon builds are not caused by the beacon formula alone. They fail because the blueprint covers fewer machines than expected, draws more power than the grid can provide, or pushes items and fluids beyond the transport line's real capacity.
| Symptom | Likely cause | First repair |
|---|---|---|
| Output is lower than the calculator | Some machines miss one or more beacon effects | Inspect the coverage of every machine and compare the actual module bonus |
| The factory slows during expansion | Beacon load consumes the grid's reserve | Add generation or reduce the beacon count before scaling more blocks |
| Belts empty beside fast machines | Input demand increased beyond belt or inserter capacity | Recalculate items per second and split the supply before adding more beacons |
| Fluid machines starve | Pipes, pumps or shared fluid lanes cannot keep up | Give high-rate fluids a dedicated path and verify pump placement |
| The block fits only after removing logistics | The theoretical layout ignores the machine footprint | Use a wider pattern or fewer beacons; a buildable eight-beacon block beats an impossible sixteen-beacon block |
Space Age and Quality Edge Cases
Space Age adds quality modules, quality tiers and new production buildings that make a single vanilla beacon rule insufficient. Keep the game version, quality target and machine type in the same calculation instead of copying a pre-Space-Age ratio.
Quality is an expected value
A quality build should record the chance of each quality tier and the recycler or recycling loop used to reach it. Do not compare expected legendary output with ordinary output as if the items were interchangeable.
Legendary beacons change the curve
The official 2.0 comparison shows that quality and legendary beacon variants do not behave like a normal 1.1 beacon. Use the current game data and label the variant in the blueprint.
New machines need new space
Foundries, electromagnetic plants and other Space Age buildings can have different footprints, module slots or recipe rules. Recheck coverage before reusing a Nauvis layout.
Mods override assumptions
Modded recipes can change permitted modules, power demand, beacon range or machine size. Treat the vanilla guide as a reasoning framework, then validate the actual mod set.
Want to compare a beaconed block with the baseline?
Use the Factorio module calculator to compare machine count, output rate, ingredient demand and power before you commit a dense beacon blueprint to the factory.
Factorio Beacons FAQ
What do Factorio beacons do?
A beacon transmits supported module effects to nearby compatible machines. The effect depends on the beacon variant, installed modules, number of beacons affecting the machine and the current Factorio version.
How many beacons should affect one machine?
Eight is a practical starting point for many compact blocks, while twelve or sixteen can be worthwhile for late-game compression. There is no universal best number: compare the marginal output with the extra power, modules and footprint.
Can productivity modules go into a beacon?
Do not assume they can. Productivity rules are tied to the machine and recipe, while ordinary beacon planning usually focuses on speed or efficiency effects. Check the current machine and recipe before making a blueprint standard.
What is a good Factorio beacon setup for beginners?
Use a small eight-beacon test block around a clearly supported recipe, keep input and output lanes visible, and compare it with the un-beaconed baseline. Add more beacons only after the power and transport checks pass.
Why does my beaconed factory not reach the calculated rate?
The common causes are incomplete coverage, missing modules, a power shortage, saturated belts or pipes, insufficient inserters, a different machine or recipe, or an active mod that changes the rules.
How big is a beacon in Factorio?
The useful answer is not only the beacon sprite size; it is the full footprint of the beacon, machine, inserters, belts, pipes and power connections. Measure the complete block and verify which machines are actually inside the effect area.
Official Sources and Further Reading
The layout examples and current effect rules in this guide are based on first-party Factorio documentation and the official Friday Facts beacon comparison.